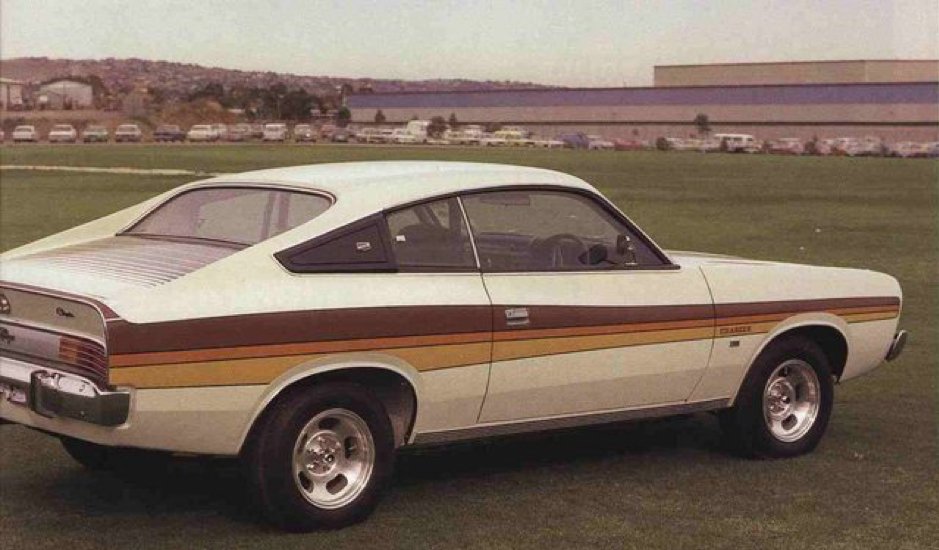

I bought my 1978 CL Charger in 2003, it is a 318 (5.2ltr) V8 with a four-speed. When I bought it, it was midnight blue with all blacked-out chrome. From the option code I found out it is one of approximately 75 Charger Drifters, and that the original colour was Spinnaker White.
The ‘Drifters’ were a dress-up package offered by Chrysler Australia Limited (CAL) and aimed squarely at the Sandman panel van market. You could get the Drifter package for the van, the ute and of course Chargers, although many people seem to only remember the van. In addition to the side stripes common to all Drifters, the Spinnaker White Chargers, also had strobe striping on the boot.
From what I have read there were only 13 Spinnaker White Drifter Chargers, and I could only locate a handful of photos of white Drifters on the internet, only one of which showed the strobe stripes on the boot.
As far as I can tell, the picture below is the original colour scheme for the car and is the only one I could find showing the strobe stripes on the boot lid:

As I'll be driving it regularly, any upgrades that will make it go, stop or steer better will be considered. I’m not planning on doing much with the driveline as it's just a cruiser, and I want reliability over outright horsepower. No doubt once the cosmetics are finished, I’ll turn my attention to the donk.
I've been dreaming of returning this one to her former glory since I found out it's a Drifter, but to be honest I never could come to grips with the three shades of baby poo brown stripes as it came out of the factory, so I've always thought that when it came time to get her re-sprayed, I'd do the stripes in blue.
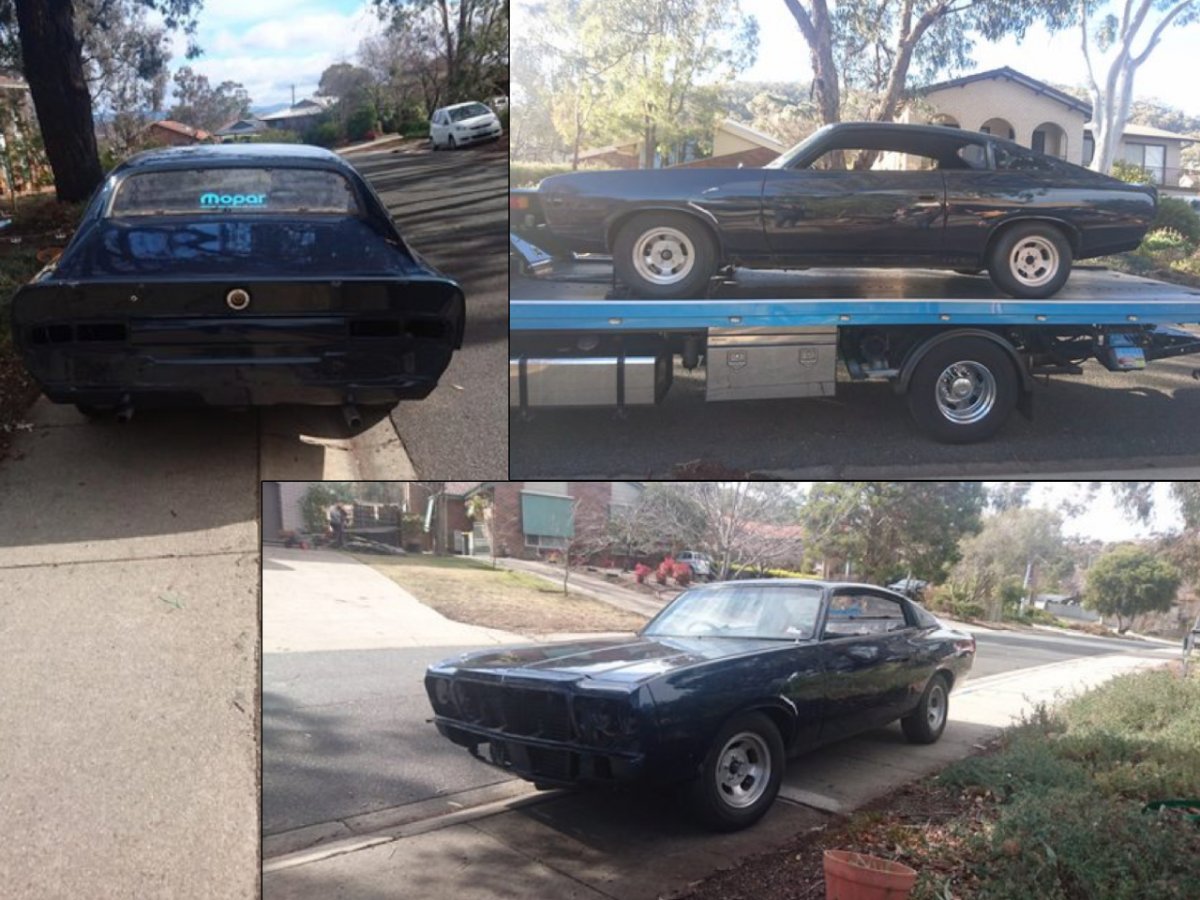
After owning the car for the better part of 15 years, in Aug 2018 my wife told me I needed to get the resto done by the end of 2019…her grand plan was that our eldest son could take it to his year 10 formal.
I spoke with a local spray painter, expecting him to tell me I'd have to sell my first born (negating the deadline at least), but unlike every other place I have spoken to previously, he actually gave me a quote, and was happy to join in my vision.
To my surprise, he said he'd be ready to take it in three weeks and would have it done for me in a couple of months. That way he could do other jobs in between and just keep mine ticking over in the background. Without realising it, he'd hit on the winning formula again, giving me a deadline to get as much tear-down done as I could in the next three weeks. I was away for two of those weeks, so we really only had one weekend and a couple of evenings to get it done.
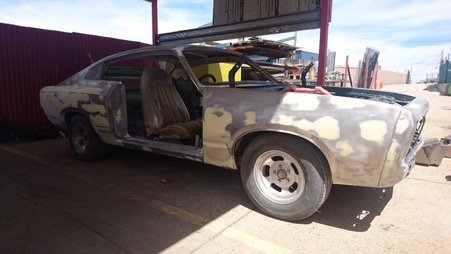
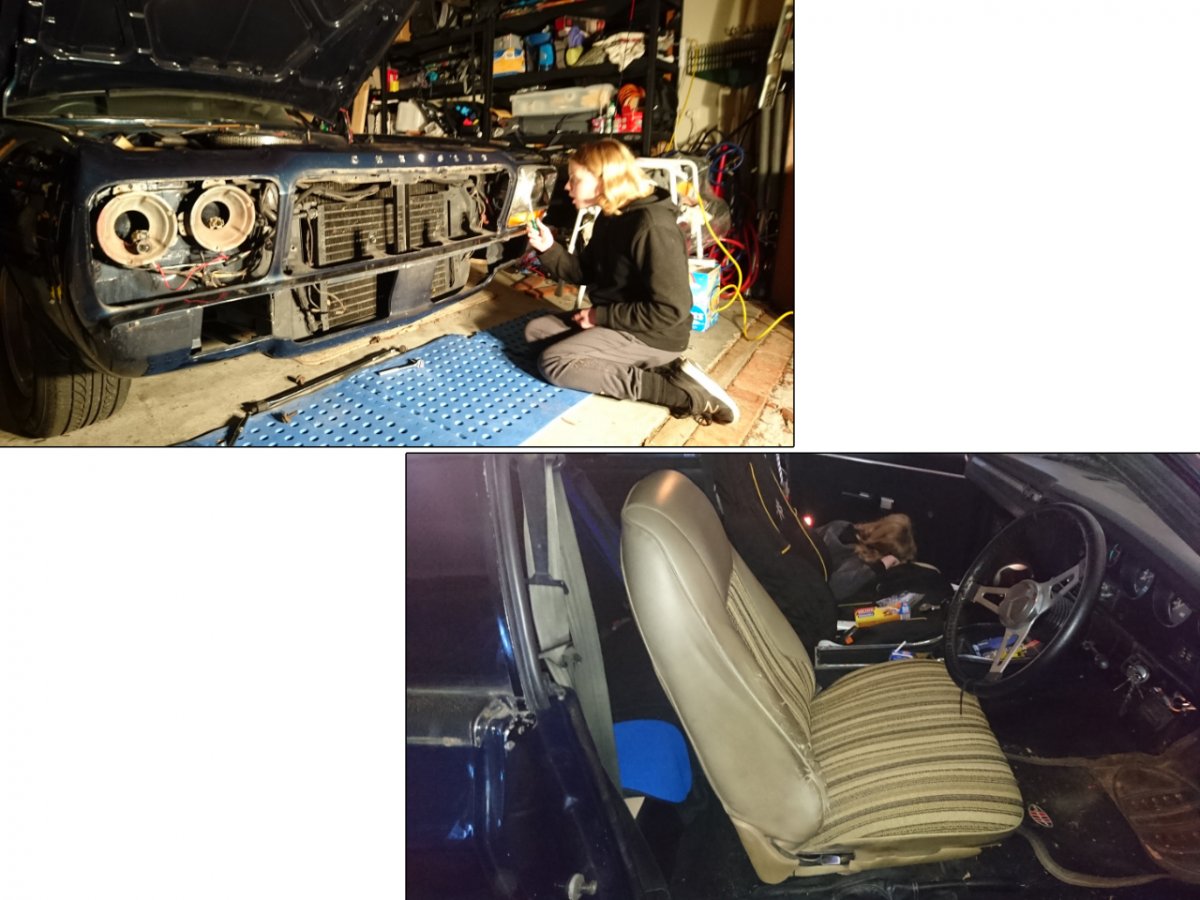
Together with my sons, we got stuck in. I was in such a rush, I completely forgot to take any 'before' photos of the whole car, although we did take copious photos as we pulled each piece off so that with any luck we should be able to figure out how to put it back together. We also bagged and tagged each nut, bolt, washer etc as we went, which would help during the reassembly and I can’t overstate the importance of taking the time to label everything as you tear down. It might be months or years before you put it back on and it can be hard to remember where each piece goes.
The motor and driveline are in reasonable shape, and I really am on a limited budget anyway, so the painter suggested leaving them in. The car was towed to the painter, who arranged for the car to be soda blasted back to bare metal. I had my fingers crossed that wouldn't reveal too much rust, and I was very lucky as there wasn’t much at all.
Front end, during stripping, with help from number 1 son:
The more I stripped stuff off, the more I came to understand that it must have been in a decent prang at some point in its life. When we pulled the passenger door card off, we could see teal coloured paint, so I think the door was a replacement as well. Whoever did the repairs seemed to have done a decent job. In the 16 years that I've had the car, there hasn't been any paint or panel alignment issues.
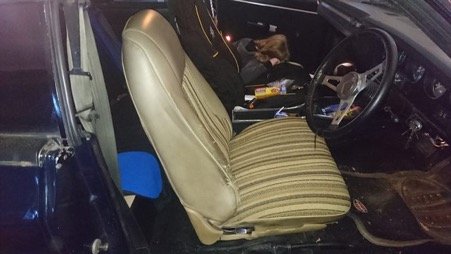
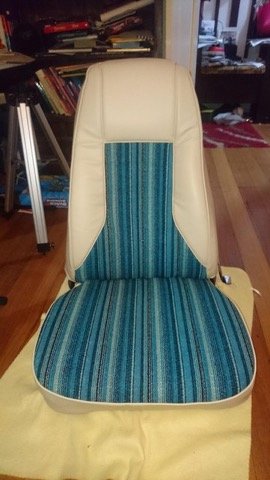
It was a bit of Heinz variety, with bits and pieces from all over the shop. The rear seat was non-factory fabric and pattern. It had non-Charger front seats with 'turbo' printed in the fabric, I have no idea what they were out of. I swapped them for some Charger ones that had the brown Boca Raton cloth as you can see in the photos below.
After the ‘tear-down’ and ready for the painter. For the observant among you, yes that's a scrape on the passenger side guard, and the lesson here is don't reverse the car into the garage when you have a migraine, it no work so good... Off to the painters...
While the car was at the painter’s I sent the dash to the Dashboard Doctor for repair. They do vacuum formed vinyl re-skins and it came out looking mint...click the link below for a cool video from their website showing a dash being reskinned.
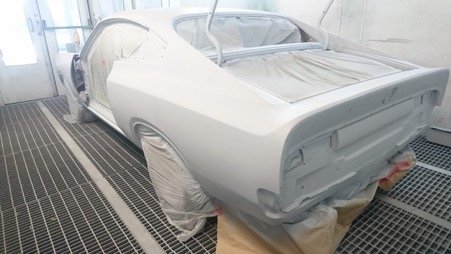
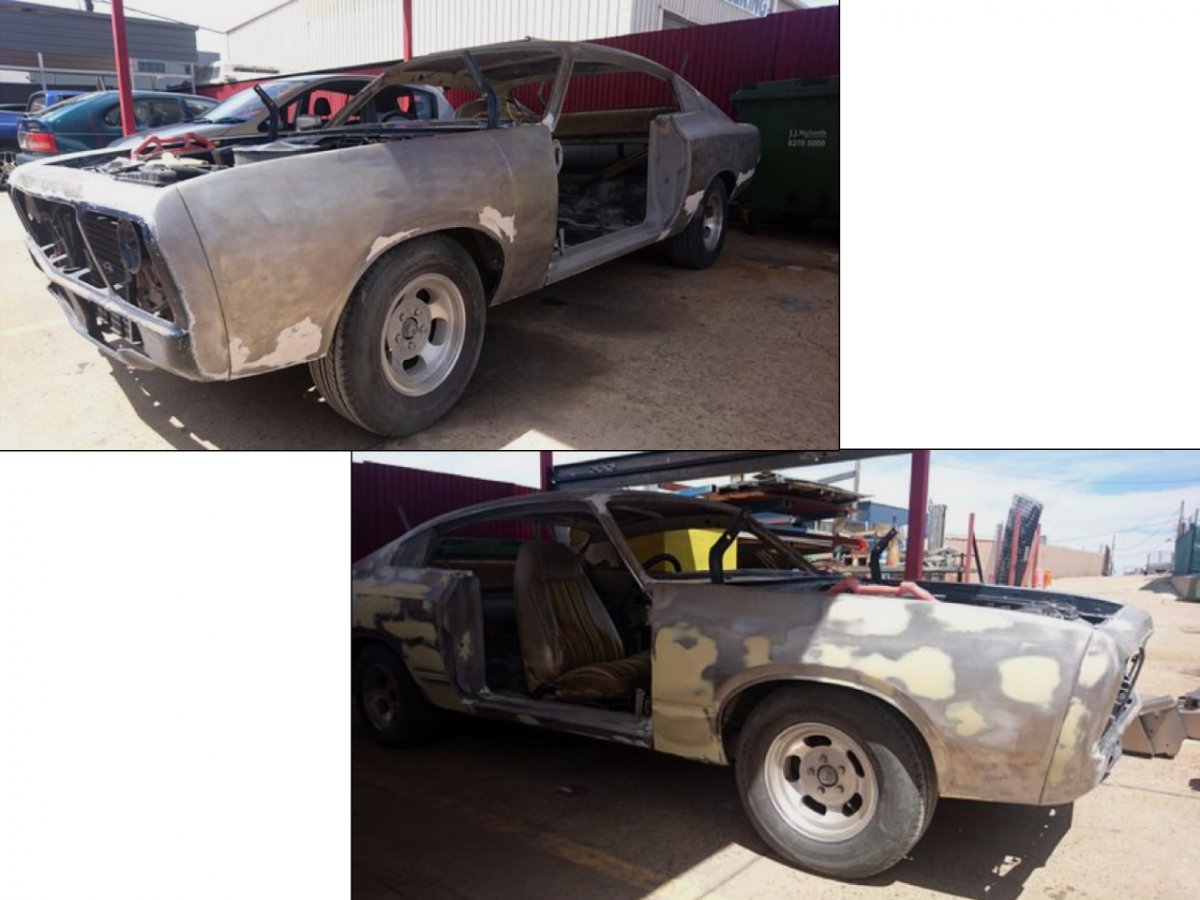
After media blasting, the painter said the Chargie (as my wife calls it) had 'a lot of bog' and he repaired some rust in the driver's side footwell, not unexpected and pretty good for a car of this vintage I guess...
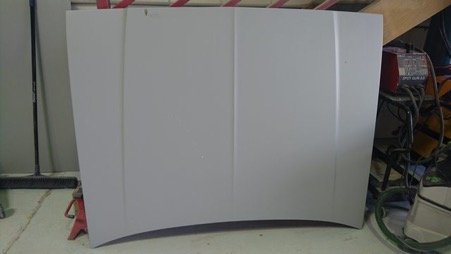
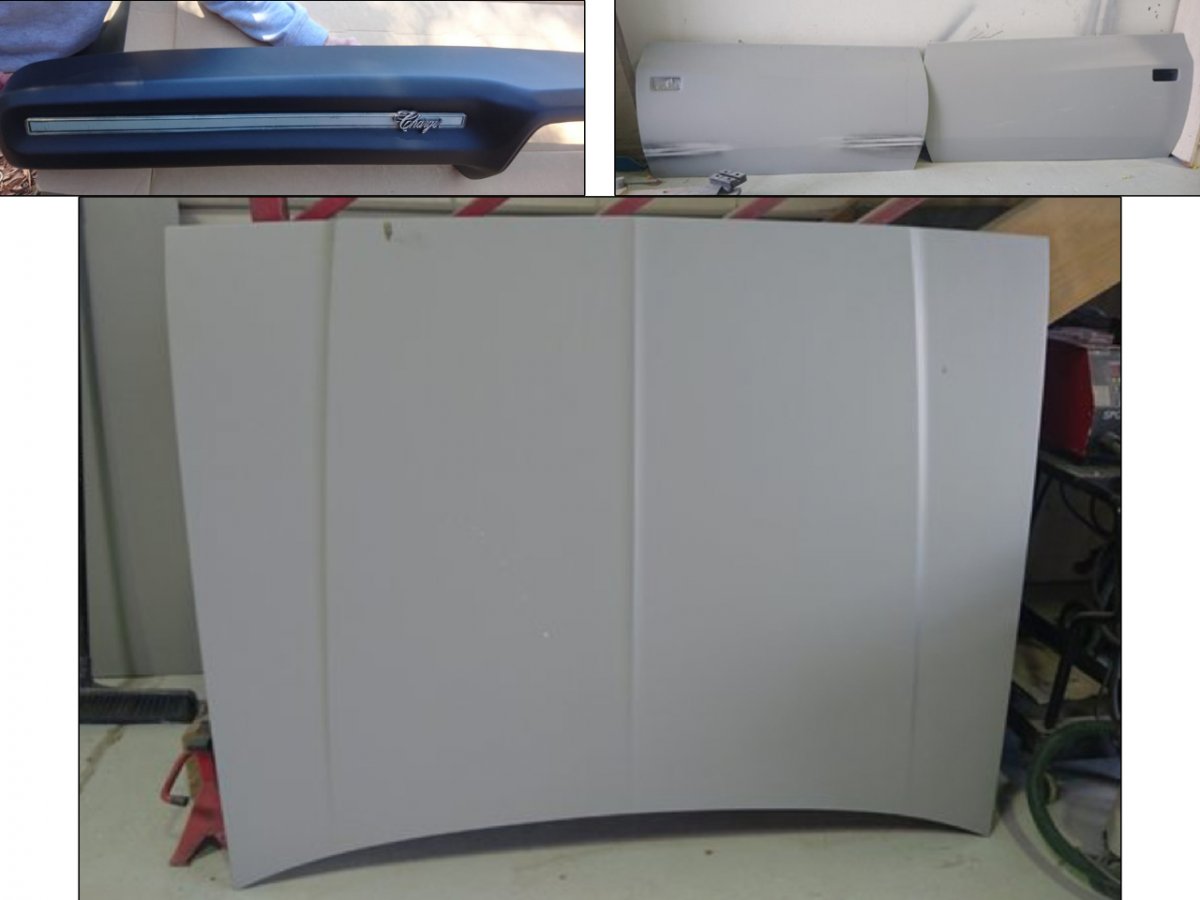
The doors, boot and bonnet were prepped and primed first. The painter said the roof is actually pretty good, and the passenger side didn't need anywhere near as much work as the driver's side. Bonnet and doors in primer.
Driver's side nearly ready for primer. Passenger side (yet to be prepped) showing some of the old bog.
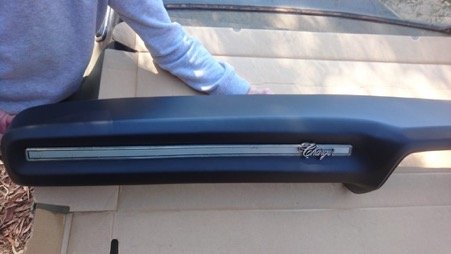
The bumper bars are typically colour coded on the Drifters, but what is the point in owning a 70’s muscle car if you don’t show the chrome?! I sent them to Albury Electroplaters who did a fantastic job of bringing the bumpers back to a beautiful chrome finish. Shiny!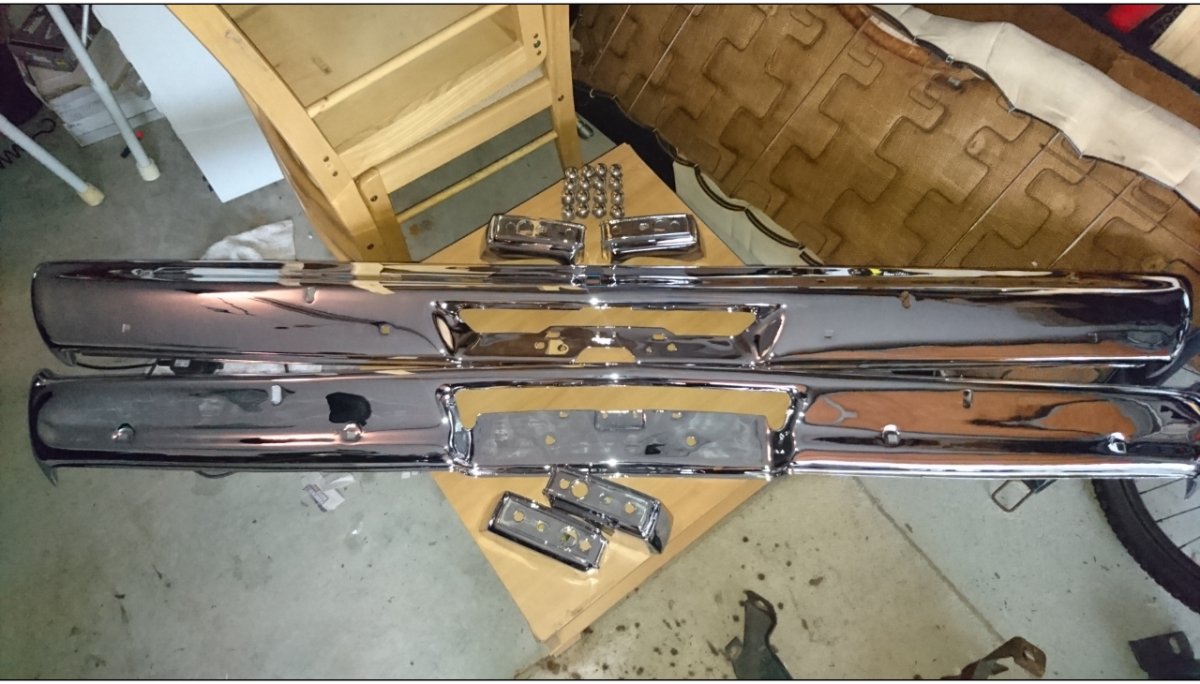
Next up is a peek at the car in high-fill primer
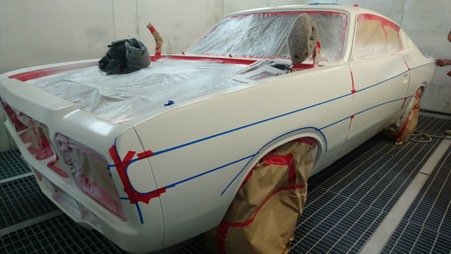
Brace yourselves as you will shortly be seeing almost the final paint job. I know the question of Drifter stripes vs no stripes, is a love it or hate it kind of deal. I just hope people will appreciate what I've tried to do which is bring the car to something like what it would have been back in the day, but with some slight, and (mostly period appropriate) modifications.
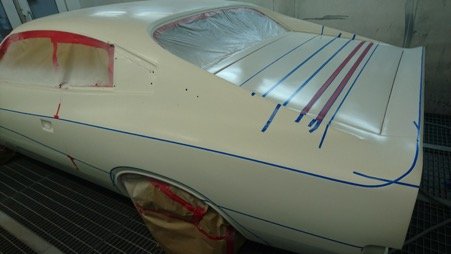
The masking up for the stripes took a full weekend with the painter and I working together. It took a quite a few goes to get the side stripes right, but I think he nailed it in the end.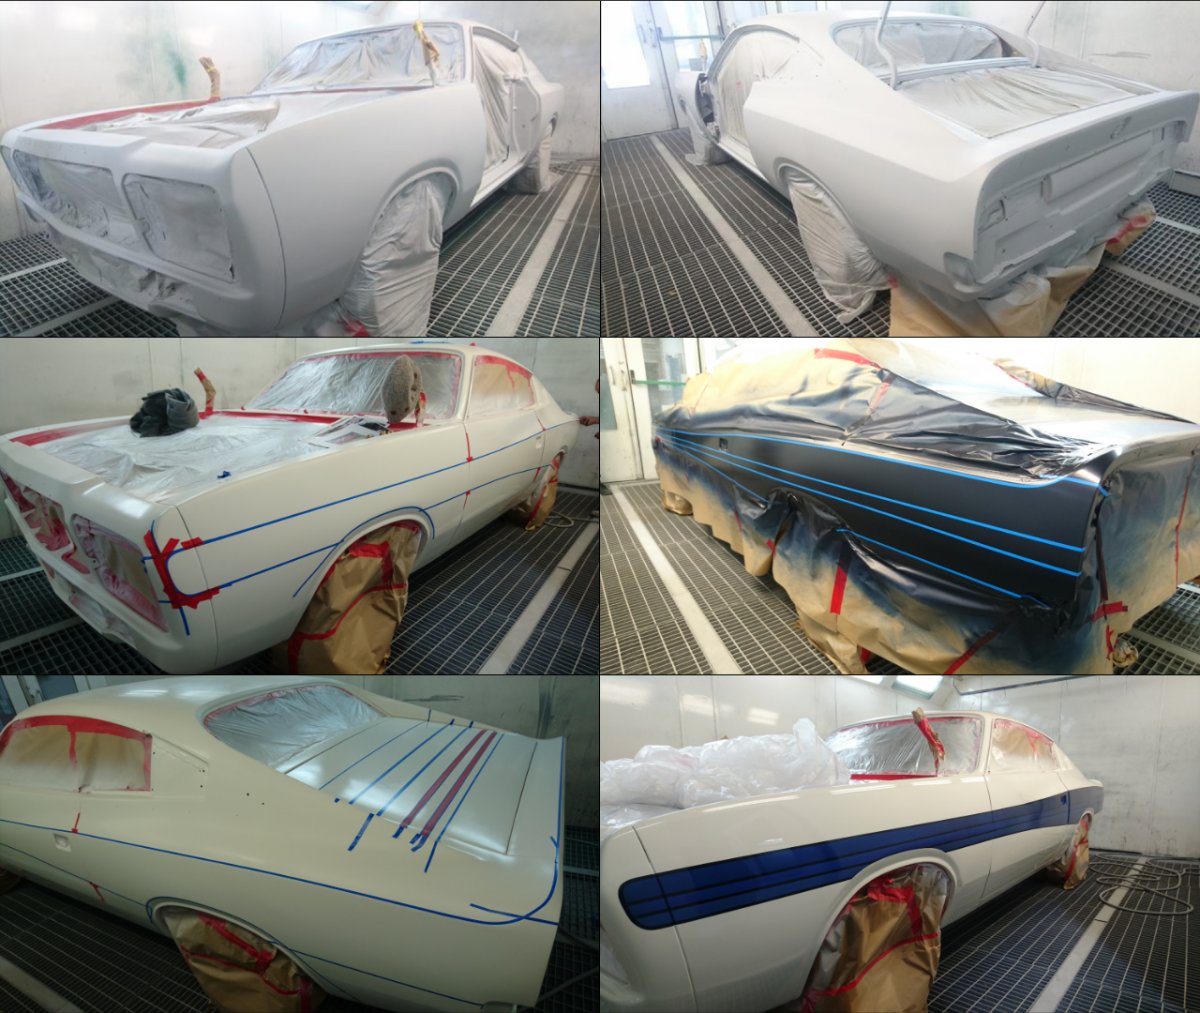
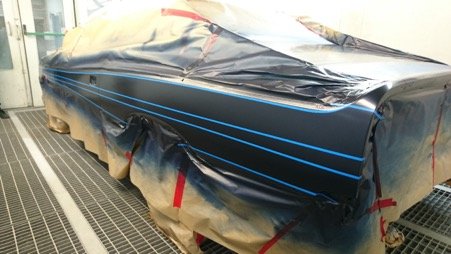
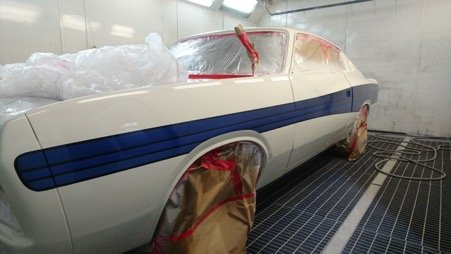
The final version of the side stripe outline, The first layer of stripe - dark blue. Being a Spinnaker White Drifter, we needed strobe striping on the boot. We spent literally hours trying to get this right, and in the end we didn't perfect it, but it's still a good effect. The final three shades of blue - there is a metallic pearl over the top but you can't see it in the fluoro lighting. In certain light the three stripes almost look the same colour, but in the sun it looks amazing.
This shot reminds me of R2-D2…
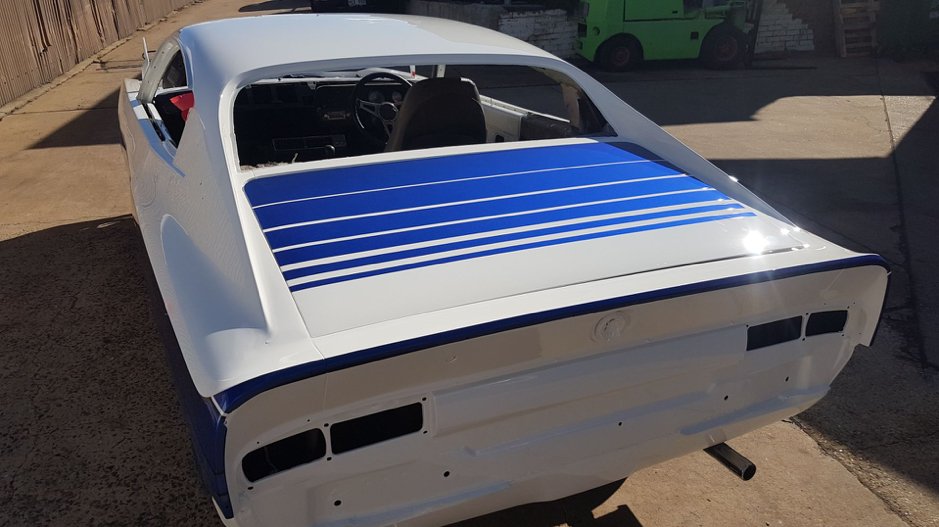
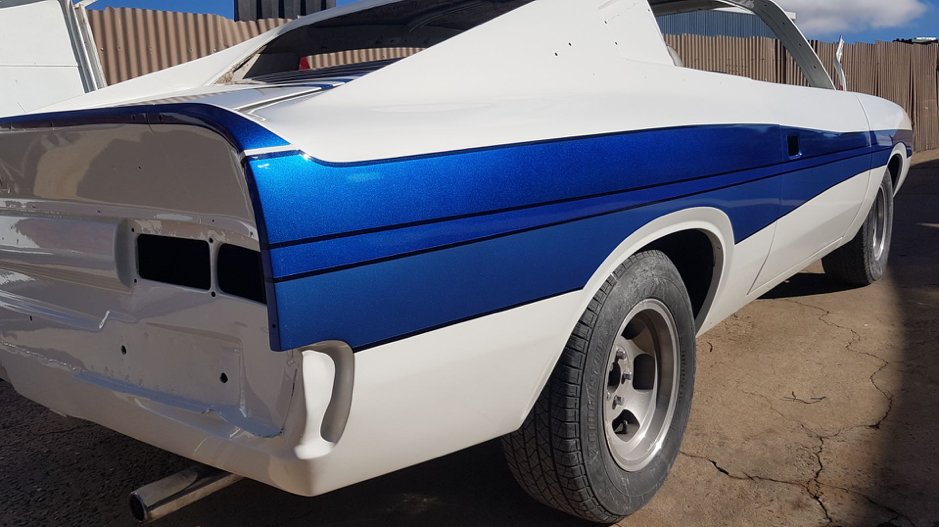
In the sun, the metallic effect looks much nicer in real life.
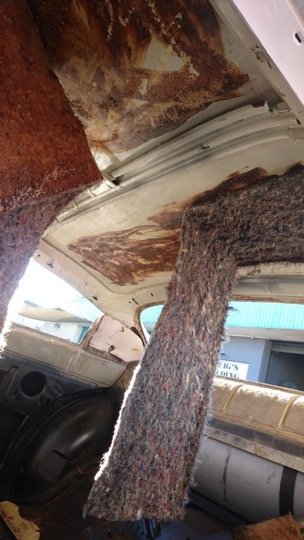
The next job on the list was to put the sound deadener and insulation on the roof so the headliner could be installed by the trimmer. The original felt actually looked pretty good, but it had to come out. In my excitement to get cracking, I forgot to take a pic until I was already half way through.
Below you can see the old felt halfway off (the brown on the roof is the old glue, not rust). I spent a couple of hours scraping the glue off, but when I started lifting paint, I decided I had gone far enough.
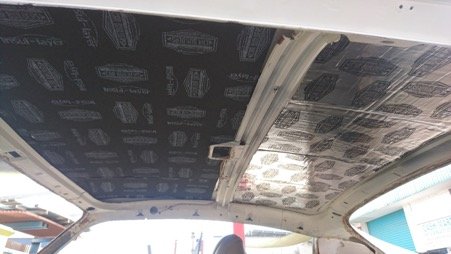
I used Carbuilders brand sound deadener which seems to be pretty much the same as the well-known Dynamat. Carbuilders have really good instructional videos. I don't have any affiliation, just impressed with the product. I got the 'muscle car' pack which includes everything you'll need - sound deadener, insulation, tools, aluminium tape, a knife and roller, plus plastic sheeting to go behind the door cards.
The silver half is the first layer which is the bitumen/aluminium 'deadener', and the black half is the final layer of closed-cell foam insulation. Gotta say, it was pretty easy to work with, this was my first time doing it and it only took a couple of hours. With a bit of practice it would be much quicker.
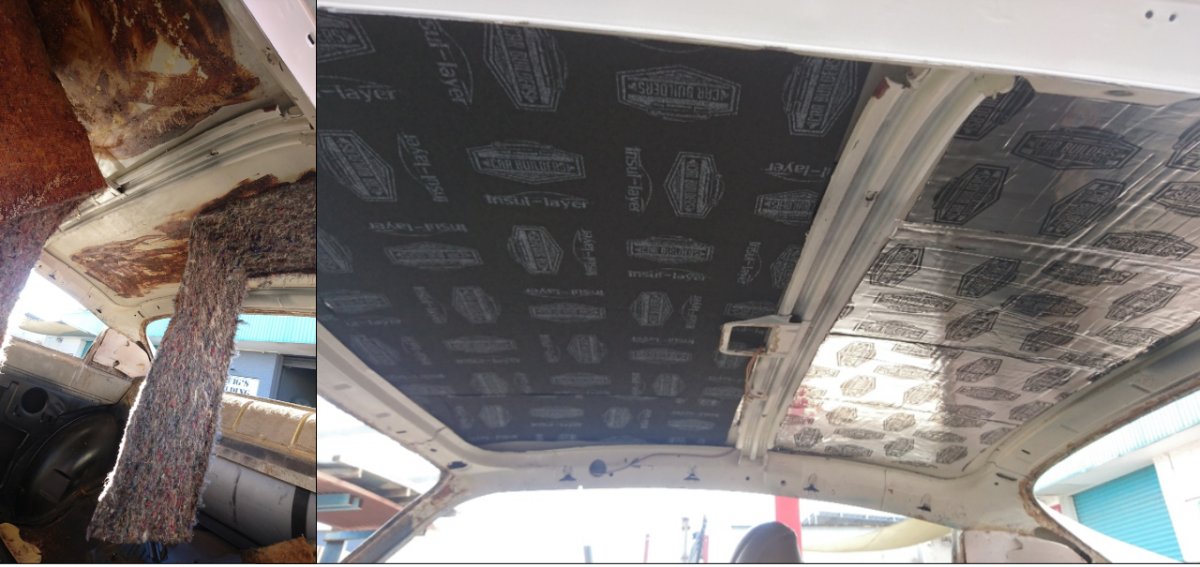
For anyone who hasn't used it before, the sound deadener makes a very noticeable difference. I am anticipating the car being much quieter once I've done the floor and doors, can't wait to hear the difference on the road. Also, make sure you leave a channel for your headliner bows, it’s really hard to get them in if you don’t. Ask me how I know…
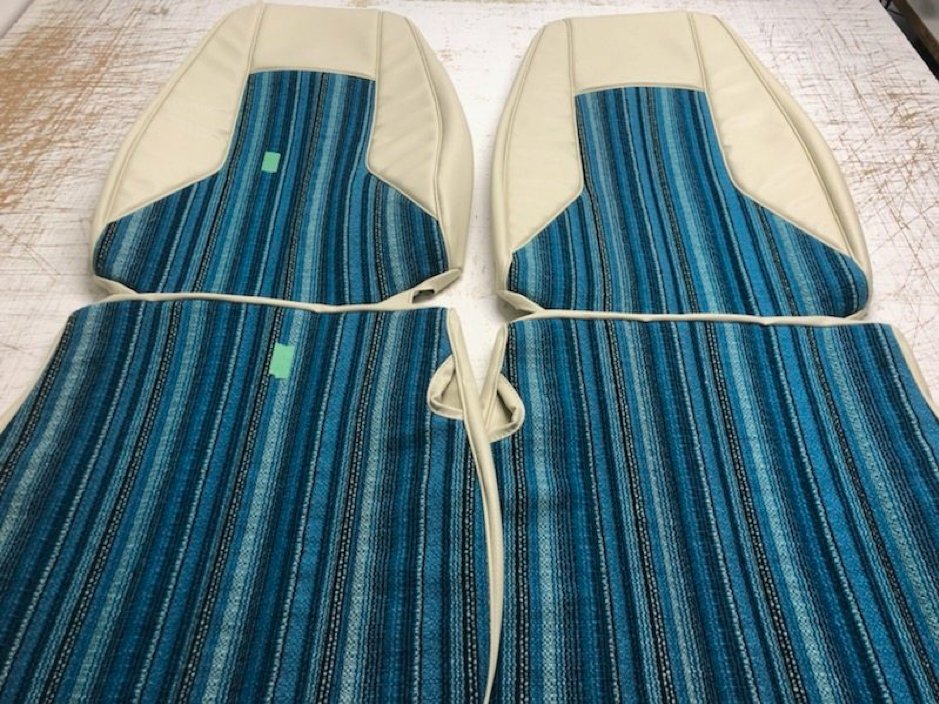
While the car was with the painter, I also had the seat skins made up using off-white vinyl with blue Boca Raton cloth inserts. Note the beautifully aligned stripes, that’s some professional work there.
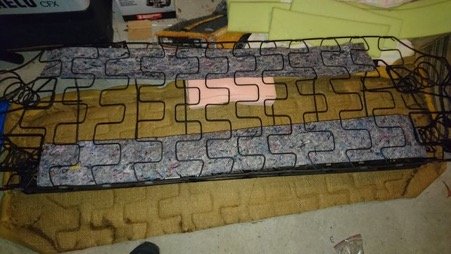
When I pulled the old seat covers off, my intention was to strip everything back to the frame and do all new foam etc, which I did for the rear seat, but the old foam on the front seats was reusable.
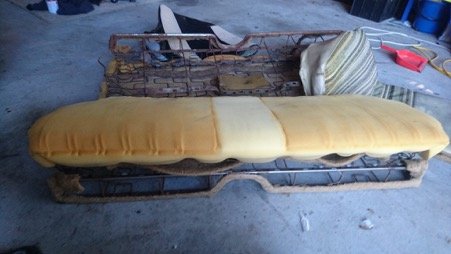
Rear seat with skin off. I’m not sure if this was the original foam, but it was pretty toasty so I decided to replace it.
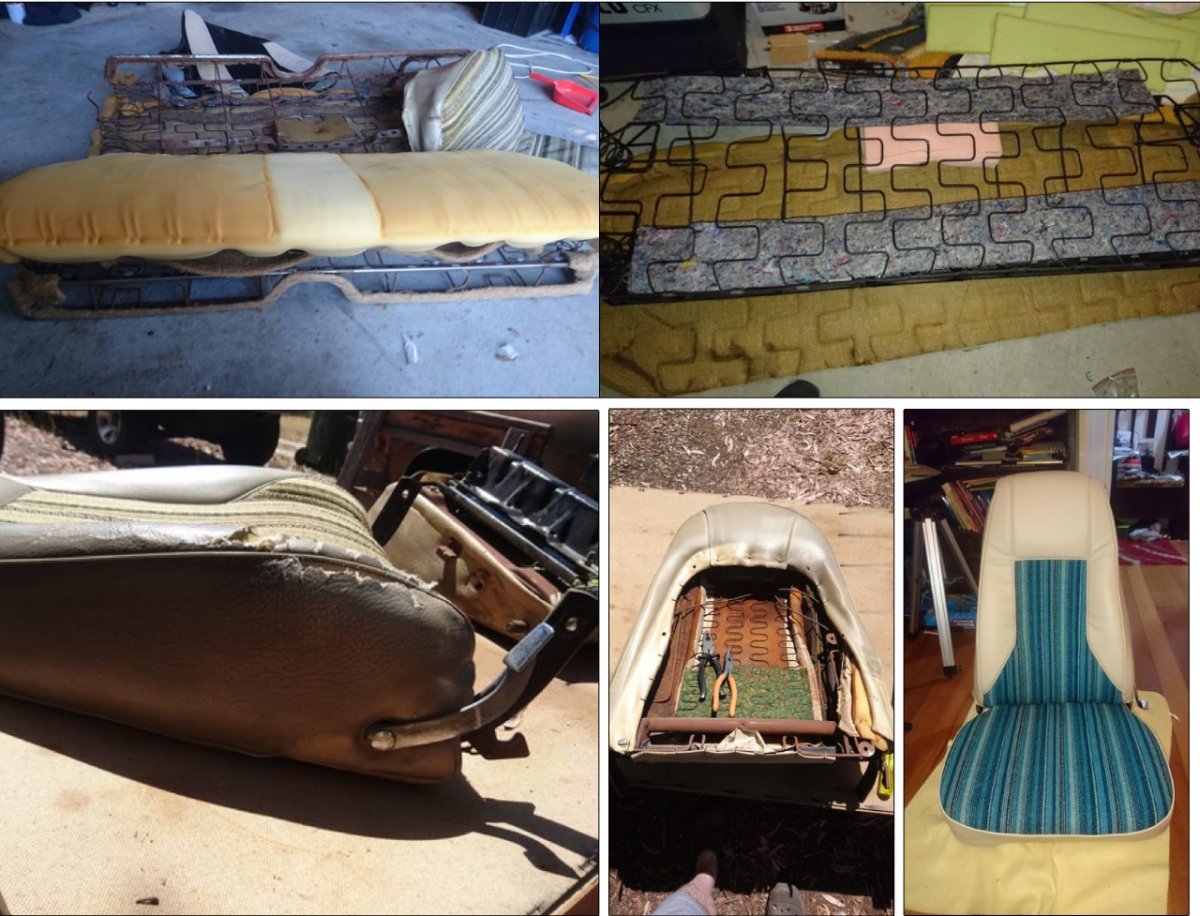
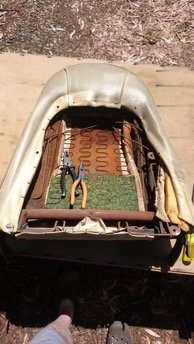
Front seats during the tear down, you can see the typical wear on the driver's side seat. As it turned out, almost all the damage was in the in the skin, not the underlying foam (well, there was a bit, but nothing worth worrying about). And the finished product.
One thing I did want to show was a cheap little tool that I bought that actually turned out to do a bloody good job for the price. The seat frames were covered in surface rust and although it was fairly light, it was impossible to get to with sandpaper or anything short of sandblasting...I didn’t want to shell out for a blasting cabinet that would have required buku dollars and take up space I just don't have.
I remembered seeing a YouTube video of a guy making a BB machine gun out of a 2ltr coke bottle and an air compressor, which gave me the idea of building myself a sandblasting gun. I figured if you could shoot BBs, why not sand? I wasn't far down the path of designing this eyeball removing death machine when it struck me that if I had thought of it, someone way smarter must have already come up with something. So I did some Googling and found the Ozito sandblasting gun from Bunnings.
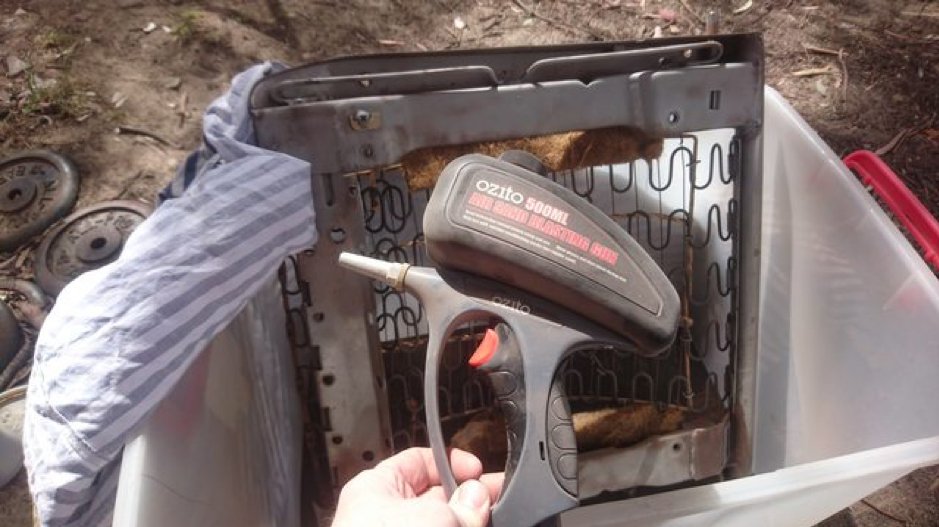
For about 30 bucks, including 2kg of media, how could I go wrong? I have to say, even hooked up to my asthmatic little Aldi compressor, this thing did the job amazingly well.
I didn't get a before pic, but the base in this photo was completely covered in rust but after about an hour with the Ozito it came out looking like this.

I used a big plastic tub covered with a fitted sheet to re-capture most of the media and just kept recycling it. I had to do it in small bursts anyway to let the compressor catch up, but I was gobsmacked at what a good job it did. I did try buying some dust free garnet media on special from SuperCheap Auto, but it was too coarse for the CFM that my compressor can (not) achieve, so it was pretty useless, but I reckon with a decent compressor it would work ok. You certainly wouldn't want to do a whole car or anything, but for those little jobs it's a winner.
Well that’s the tale of the tear down and paint work – check in with us soon for part 2; the rebuild!!